Quantcast
Channel: Miss Abigail's Hope Chest
Viewing all 212 articles
Browse latest View live

Heirloom Cameo Pin

$
0
0

This is a cameo pin that belonged to my grandmother Aurora Kathinka Burke Bunnell. It is beautiful and I'm so glad that it came down to me. Heirlooms are wonderful aren't they? I think it is lovely that I have a few heirlooms to put in Miss Abigail's hope chest.

Aurora Kathinka Burke Bunnell 1903-1989


Going Forward - My Beautiful Grandchildren

$
0
0

I guess I'll finish Family History Month with a picture of my beautiful grandchildren! It certainly took some doing to get such a great picture and I'm grateful to my three lovely daughters-in-law for their considerable trouble. Kate Mower is a truly talented portrait photographer. If you are in the Phoenix area or can drive there, you'll want to dream about what your own family pictures might look like.

Eyelet & Ribbon Dishtowels

$
0
0

I've started the next kitchen set - a pink and brown floral set. The fabric in the background is for the apron. These have to be the absolute easiest dishtowels I've made so far and I like them a lot. They are very simple, but still cute! All it took was to sew down the edges of the eyelet lace and then thread the ribbon through. I've used this technique along the hem of pillowcases for my own linen closet and you may remember it on this sheet set for the hope chest. They are so quick that I think I will make some for me!


Dotted Rick Rack Dishtowel

$
0
0

This towel turned out so cute! I thought it would be fun to attach the larger rick rack with French knots and and I love the way it looks. BTW, my favorite stitch for monograms is the chain stitch. This stitch creates a thicker line, which I like. I often find ideas for monograms from this site called the Daily Drop. There is just this one towel because the knots were a bit tedious, but still a fun addition to the pink and brown set for the hope chest.

Embroidered Bunny Dishtowels

White Bird Serving Dishes

$
0
0

These pretty serving pieces were my gift to Miss Abigail for her sixteenth birthday. She helped me pick them out and I am glad she chose plain white. Such a nuetral color will make them versatile. We were thinking how pretty they would be on a "tea" table, or even on a mantle or lamp table with shells.


A Peek Inside: "Blankie" Scraps

$
0
0

Okay, I am a little ashamed to have kept this, it really should have been thrown away. But mom's can be pretty sentimental. About this, you ask!? Well, yes. This is all that is left from Miss Abigail's "blankie." Abigail herself says, "Mom, it looks like something you would push out the door with a stick." I have to agree. But, I have put these last shreds in a little box in the corner of the hope chest. She might get a kick out of it someday. BTW, she HATED me to wash the thing because then it didn't smell right and it didn't feel right. (Sigh...)

A Peek Inside: Tan Cross-Stitch Handtowels


Pink and Brown Diagonal Dishcloths

$
0
0

These dishcloths are another item made for the Pink/Brown kitchen set that I am currently working on. I used the Diagonal Dishcloth pattern. After I finish this set, I have just one more fairly large kitchen set planned for the hope chest and then I am finished with kitchen linens. Then I want to do a few table linens. Soon I will need to start on quilts and some more baby items. Miss Abigail's hope chest is growing large. The actual chest is now overflowing to the secondary hope chest, which is a lovely antique four-drawer clothes chest. It may be true what my funny husband says: "Abby will need a U-Haul to carry her hope chest away."

BTW, a good friend of mine tells me that she can't understand this diagonal pattern very well, but can't express what is wrong with it. Has anyone else tried it and been disappointed? What can I fix about the pattern that would make it easier to understand, particularly for beginners. This dishcloth is so easy and quick to do. I certainly welcome any suggestions that would make the written directions better. Just email me!

Tutorial - Fabric Border Dishtowels

$
0
0

Fabric borders are a simple, quick embellishment for dishtowels for the hope chest. This tutorial shows how to make a simple thick/thin border. Because I wanted to use this pretty border print, the contrast is subtle in these towels, but more apparent with other, more contrasting, fabric choices.

Materials for TWO towels: 1/4 yd. of 44-45" fabric A, 1/4 yd. 44-45" contrasting fabric B, matching thread, two flour sack dishtowels, tape measure, scissors, rotary cutter, ruler and mat, pins, iron and ironing board.


First, cut the hem from the bottom end of the towel. From both fabric A and fabric B, cut one 5" strip and one 2 1/4" strip. Measure the width of both towels from side to side. Trim a wide strip and a contrasting narrow strip to fit each towel width, plus 1 inch. You'll have to measure each towel because they will vary in width.


I'll continue to give directions for one towel. Just repeat with the opposite fabrics on the second towel. Press 1/2 inch along the top of the narrow strip.


With the right sides together, fold the larger strip in half. Use a 1/2" seam allowance to sew across both short ends. Clip the corners and trim the seam allowance. Turn right side out and press.


Pin the larger strip to the cut edge of the wrong side of the towel, aligning the side edges.


Pin the cut edge of the narrow contrasting strip atop the rest with 1/2" overlapping the edges on each side.


Sew the layers together, using a 1/2" seam allowance.


Fold the towel up and press the seam. This is the back of the towel.


Turn the towel to the front side and press the narrow strip up. Tuck the 1/2" overlap around the seam at the edge and press and pin the narrow strip across the front side of the towel. You may need to adjust a little to make the edges flush and neat.


Edgestitch around the three sides of the narrow strip, pivoting at each corner. Be careful to keep the seam line neat and straight and as close to the edge as possible.


Press the towel and clip any loose threads.


And it is finished!


Miss Muffet Wall Plate

$
0
0

Miss Abigail has been redecorating her room. I saw this wall plate in an antique store when Abby was a young child and the face of Miss Muffet reminded me so much of Abigail. It has hung above her bed for many years now, but I guess I can understand why she is retiring it. ;o)

Into the hope chest it goes. She may want to use it in a nursery some day.

Sweet Sixteen Crystal Vase

$
0
0

This was Miss Abigail's purchase for her hope chest to mark her Sweet Sixteen birthday. Perhaps she's dreaming of the beautiful flowers some handsome man will give her someday!

Cluny Lace Terry Hand Towels

$
0
0

These terry towels are included in the Pink/Brown kitchen set for the hope chest. I truly love anything embellished with a bit of cotton cluny lace! I also like the smallish size of the terry "bar mop" towels. When I'm cooking I would sometimes rather use two small hand towels rather than one bigger one, and the size of the bar mop seems just right.


Crochet Edged Waffle Hand Towels

$
0
0

The crocheted edge on these microfiber waffle towels is the same pattern as on the waffle towels in the Peachy/Green kitchen set. I kept notes this time on how I made the edge, but realized that the variegated thread was not the best example to do a tutorial. So I will look for another chance to create a tutorial using a solid color thread.

Tutorial: Brown Waffle Weave Hot Pads

$
0
0

Crocheting these hot pads for the hope chest was the most fun I've had in some time. But thinking about and writing the directions and tutorial was not! Here is my best attempt. I hope the pattern makes sense.

I used Peaches & Cream worsted weight cotton and a size G hook.

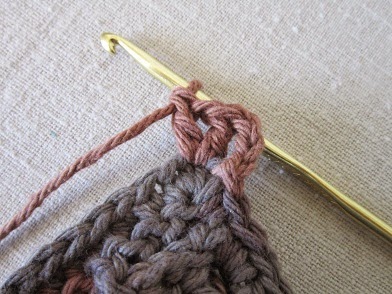
Special stitches: This pattern is based on the Post Stitch. Rather than working in the tops of the stitches of the previous row, post stitches work around some stitches, creating a lovely raised pattern. To make a front post double crochet (FPdc), catch the yarn over the hook as usual. The hook is inserted from front to back, around the post of a stitch indicated (usually in a previously worked row). The hook is pushed out again to the front on the other side of the stitch. Yarn over, then carefully pull up a loop back around the post (3 loops on the hook at this point). Catch the yarn over and draw through 2 loops, twice. FPdc made! For a back post double crochet (BPdc), the motion is repeated, except the hook is inserted from the back to the front around the post of the stitch indicated, carefully pulling the loop around the post to the back. It is awkward to work these stitches at first, but you'll soon get the hand of it. The pictures should help, but if the post stitches are confusing, try looking up a video about post stitches on YouTube. It might help to see moving pictures.

To make a half-double crochet (hdc): A half-double crochet is longer than the single crochet but shorter than a double crochet. Hdc is made with a yarn over the hook once. Insert the hook in the stitch indicated, yarn over and draw through the stitch (3 loops on hook). Yarn over and draw through all three loops, completing the hdc stitch.

To begin: Chain 27.
Row 1: Dc in fourth ch from hook (skipped ch 3 counts as the first dc) and in each chain stitch across. (25 dc) Mark this side as the right side.


Row 2: Ch 2 (counts as the first hdc), turn.


Work FPdc around next two dc stitches.


Work BPdc around next dc.


 Work (FPdc around next two dc stitches and BPdc around next stitch) across to the last three dc.


Work FPdc around the next 2 dc, hdc in last dc.


Row 3: Ch 3 (counts as the first dc) and turn. Dc in the tops of the next two stitches.


FPdc around next stitch (this is the BPdc from the previous row).


(Dc in the next two stitches. FPdc around the next stitch) across to the last three stitches. Dc in the last three stitches.


Rows 4-11: Repeat row 2 and 3.
Row 12: Repeat row 2. Fasten off.

Repeat pattern 3 more times for a total of 4 pieces.


Edging: Row 1: Hold two pieces together, back to back, with the last row worked at the top. Working through both pieces at once, join with a sc in the top of the first dc of the right corner. Ch 1.


2 sc in same stitch – corner made. *Sc in each stitch across to last stitch in the row. (23 stitches).


3 sc in last stitch of this row– corner made. Repeat from * twice more. Sc evenly down the last side (23 stitches), slip stitch to the ch 1 stitch in the first corner.


 Row 2: Chain 4. (dc, ch 1, dc) – corner made.


** Dc in each stitch to the second sc in the next corner stitch. (Dc, ch 1, dc, ch 1, dc) in the second sc of corner stitch to round corner. Repeat from ** two more times. Dc in each stitch down last side. Slip stitch in top of first corner and fasten off. Weave in yarn ends.


I think these hot pads are cute and I love how thick they are and how bumpy they feel when I hold them. Give it a try!


Young Womanhood Recognition Award

$
0
0

Miss Abigail achieved a milestone this month. Some of you may remember this post, where Abigail describes her first ten-hour project for the Personal Progress program sponsored for the young women of our church. She was just twelve years old at that time and just beginning the program. Abigail set a goal last year to finish all the requirements to complete the program and get the award. She finished up in December and I am really very proud of her. It isn't an easy thing, especially if you do it right. Many young women don't complete the award because it just takes too much effort in an already busy teen-age life and the time just runs out. Young girls really can't do it without some mentoring and that just isn't always available to all girls. So, I certainly don't judge or criticize, and I am glad that Abigail has had the right opportunities and good help available.

There are six categories in which the young women set personal goals. They need to complete several learning activities and projects within each category and then finish up with a ten-hour project of their choice that represents what they have learned about that value. The minimum requirement is ten hours, but most of Abigail's projects took many more hours than ten. The values center around the character traits of Faith, Divine Nature, Individual Worth, Knowledge, Choice and Accountability, Good Works, Integrity and Virtue. Abigail's projects resulted in knowledge and skill in photography, sewing, hospitality, cooking, service, and so much more. You have actually seen many of the results posted here on the blog. I asked Abigail to write her thoughts for this post:

"I've just completed Personal Progress, a program designed for young women ages 12-18. The program helps us come to know who we are and what we can accomplish now and in the future. It helps us draw closer to God. Now that I am finished, I've thought a little bit about what was the most meaningful part of Personal Progress for me.

I think looking back and seeing how much I've grown as a result is very meaningful. Through Personal Progress, I have learned to appreciate my worth and the worth of others. I appreciate the value of a knowledgeable and wise mind and the importance of a kind, honest and virtuous character and ultimately, who I am. I am a daughter of God, who knows and cares for me. I am worth more than any amount of money, and so are all of Heavenly Father's daughters. I look back on the time when I was twelve years old, and now, at sixteen I see how much I've grown. A little maturity helps, but a lot of that growth I can attribute to Personal Progress. It has given me a running start in the race of life. I can now go on and become the woman God would want me to be, and help the other young women in my ward (congregation) in their Personal Progress as I go." --Miss Abigail


Celebrating "Inspire Your Heart With Art" Day

$
0
0

I had not heard of this minor holiday before this year. It causes me to think about all the ways art and creativity have blessed my life. My mother is the single most important creative influence in my life. She expressed her artistry constantly in our home. She always had some music playing -beautiful, rapturous music, like Rachmaninoff, that just made my soul soar. All the pretty things around me were the work of her hands. Things like the painted kitchen cupboards, my hand-sewn dresses, the living room drapes, the watercolors on the wall, the artful arrangement of knick-knacks on the lamp table, the flower garden and even the molded Jello were all the result of her constant effort to bring beauty into our lives. She always had a project of some kind going and one project just bubbled constantly into the next. With such an example, I could not help but be creative myself!

We all live a life of which beauty is a part. While we are all not named as artists, each of us responds in some way to that which is beautiful. Many of us see a necessity of keeping beauty around us. Vibrant color, fascinating form and designs, exciting textures and patterns seem to fill some part of our soul. In my mind an artist is simply one who makes beauty visible (and certainly audible or tactile) and thereby holds onto the beautiful for a little longer.

I became aware of "Inspire Your Heart With Art" Day when a reader associated with an artist named Patience Brewster invited me to consider some way in which I could celebrate this day and encourage others to bring art more fully into their daily lives. Of course I went immediately to the Patience Brewster site and was tickled to view her pages of whimsical ornaments and figurines - and wouldn't you know, she even has some designs embroidered on tea towels!

So I am responding to the invitation by posting a picture of the sweatshirt I recently remodeled. I think it turned out pretty cute. I wanted to bring a little bit of color and warmth into the middle of winter. I created a tutorial and posted it over on our Hyer Homestead blog. I am celebrating today by listening to some rapturous music and thinking of my mom while I paint some recycled glass jars meant for the pantry we are creating in our laundry room. I know that so many of you all are creative and artistic because I stalk your blogs and find inspiration in what you are doing. So, join the celebration! Think about how you can bring art, even ordinary, homey art more fully into your life. You never know who you will inspire.


Happy Valentines Day

$
0
0


Happy Valentines Day from Miss Abigail and Me!

A Peek Inside: Sewing Instruction Book

$
0
0


I think a sewing instruction book is a must for Miss Abigail's hope chest. Have any of my older readers noticed how the sewing patterns of today are really quite short on instructions? The pattern companies must assume that those using their patterns already have quite a lot of experience with sewing. Even those designed for beginners! Although these are somewhat better, I find all patterns are really lacking when it comes to giving a true picture of the necessary steps of the sewing process.

This lack became apparent to me as I taught Miss Abigail to sew. I quite clearly remember learning to sew. I watched my mother, first of all. I learned some basic techniques from my home-ec classes in Junior High. Mostly I sewed at home, by myself, and gained hands-on experience by following the instruction sheet included with the pattern. Even in home-ec class, we followed the pattern instructions and then received help from the teacher (or mom) only as we ran into problems or had questions. Today I find myself constantly having to demonstrate or explain additional steps to Abigail.

I really like this Singer sewing instruction book. The explanations are clear and complete. The pictures obviously help illustrate the various techniques. It is almost as if this publisher understands what is missing in the pattern sheet and supplies this additional information. What a blessing! Miss Abigail just isn't quite as passionate about sewing and needlework as I am. But she is still a capable sewist and now and then I see the spark in her eye. But until she does a lot more unsupervised sewing, she will need this book to remind her of what those pattern instructions really mean.

This next week Miss Abigail will be altering and embellishing a hand-me-down Prom dress. Wish us luck wih that! If it works well, we'll show pictures.

If you are struggling with your own sewing, it could be you only lack clear instructions. Try this book.


Crochet Edged Baby Blankets

$
0
0

So, I've been to Idaho and had a nice long visit with my mom. Of course, while I was there I made several visits to my very favorite craft store (this post explains why I would) and found a number of treasures for Miss Abigail's hope chest. My mom is elderly now and so we tend to just sit and visit. This gives me a wonderful opportunity to do handwork. These pretty two-layer flannel receiving blankets are sold in Porter's as a kit project. The pieces are cut and basted and then machine hemstitched around the raw edge. Machine hemstitching creates beautiful, evenly-spaced holes all along the edge of the blanket, which is perfect for crochet.

Hemstitching was originally a hand sewing technique. Actually, it still is. However, in 1893, a hemstitching machine was developed to mimic this hand-stitching. The most common hemstitching machines had a double needle and double bobbins with a sharp piercer that made holes in the fabric and the two separate needles that sewed the hole open. The hemstitching machines were produced commercially during the early 1900's and were very popular with home sewers in the 1930's and 40's. There are still some hemstitching machines being manufactured but they now cost thousands of dollars. Lucky you if someone in your family owns an antique machine. They are very sturdy and many are still in use. I don't know who sews the hemstitch on these blankets for the store, but I do know they are produced locally. Since I can't find them anywhere else, I always try to get one when I go to Idaho.


There are lots of different designs and patterns for the edging. I'm going to show you how I made the edging for these blankets. The pattern was on a free flyer hanging near the kits and thread. The pattern is called "Xs and Os" and naturally, I had to change it because I liked a half-double crochet stitch better than a single. For this blue blanket, I used DMC Cebelia thread, size 10, with a size 7 steel crochet hook. The second picture shows a close up of the hemstitched edge.

Xs and Os Crochet Edging (US stitches) 

In any hole, cast on with a single crochet. *Skip one hole, half-double crochet in the next hole, chain 3, half-double crochet into the skipped hole. Repeat from *. End with a single crochet in the beginning hole. Fasten off.


As the pattern directs, begin in any hole with a single crochet. Skip the next hole and then make a half-double crochet in the following hole. (Because I wasn't taking pictures of my crocheting in Idaho, this picture shows a continuation of the pattern already begun. Sorry.) Chain three.


Come back and make a half-double crochet in the previously skipped hole. The chain three makes a pretty O and the half-doubles create the X. Just continue the pattern all the way around.


The blue/green blanket was 36-inches square. This pretty purple/green blanket kit is 45-inches square and had a burp cloth included as well. I tried a shiny nylon variegated thread for this blanket, but think I prefer the cotton DMC. Same size thread and hook and the blue.


Short of taking a trip to Rexburg, Idaho, I can't tell you where to find these blankets. There are some hemstitching businesses online. I Googled hemstitched baby blankets, and saw a number of choices. When I do edges without the benefit of hemstitching, I just use the embroidery awl technique that I posted about here. You can try using a single wing needle on your regular zig-zag sewing machine. Several heritage clothing sites have directions or tutorials for this technique, or check You tube for this video that explains how. The wing needle produces holes that can be closer together than the machine hemstitching. Perhaps you can adjust the stitch length or, depending on the crochet pattern you may need to make adjustments to the pattern. For instance, use a single-crochet for the Xs and Os pattern instead of the half-double crochet, or skip more than one hole.

Although I am still working on the Pink and Brown kitchen set, for some reason, babies are on my mind. I'm glad to have these blankets finished for the hope chest.
Viewing all 212 articles
Browse latest View live