Quantcast
Channel: Miss Abigail's Hope Chest
Viewing all 212 articles
Browse latest View live

"Garden Series" Crochet Edgings: #1-The Garden Fence

$
0
0

This edge is quite similar to the crocheted edge on the gingham towels in the last post, but is crocheted directly onto the towel and is narrower in width. The benefit of crocheting directly onto the towel is that the process is much quicker than making the lace and hand-sewing it on. A sad fact is that the lace will be discarded along with the worn-out towel. Crocheted lace is extremely durable and will far outlast the towel, but the process of unpicking hand stitching, fitting the lace to a new towel and then re-sewing the lace by hand may truly be more work than most people would find time for. So, I simply use patterns that are quick to crochet and try to remember that my work will bring happiness during the time in use and let go. The stitch used in this edging is double crochet which goes very fast for me. It reminds me of the pretty wire fencing around our front yard.

Garden Fence Edging:

Foundation Row: Use a washable marking pen to mark 3/8-inch marks across the edge. Push an embroidery awl through the first mark to make a tiny hole.


Pull up the thread and make the first slip knot. Chain 4.


(Use the awl to make several more holes at the marks. Stay ahead of your crochet about 8-10 holes.) *Sc, ch 3 in the next mark. Repeat from * across, ending with a sc in the last hole.


Row 1: Ch 3; turn. 2 dc in the next ch-3 space, ch 1. (3 dc, ch 1) in each ch-3 space across to last space. 3 dc in last space. Ch 3; turn.


Row 2: 2 dc in next 2 dc, ch 1. Skip next ch-1 space. 3 dc in next 3 dc, ch 1. Repeat [Skip next ch-1 space. 3 dc in next 3 dc, ch 1] across to last group of three dc. 3 dc in last 3 dc; turn.


Row 3: Skip next dc, dc in next dc, ch 2, dc in same dc. Sc in next ch-1 space. Repeat [Skip next dc, dc in next dc, ch 2, dc in same dc. Sc in next ch-1 space] across to last group of three dc. Skip next dc, (dc in next dc, ch 2, dc in same dc). Sc in last dc. Fasten off. Weave in ends.


I have two more edging patterns designed for this set of towels. Check back for these tutorials next week.


"Garden Series" Crochet Edgings: #2-Posies

$
0
0

This is the second thread crochet edging in my Garden Series. "Posies" has just two rows with a very simple scallop. Prepare the towel and begin the Foundation Row as in the Garden Fence Edging. Use a washable marking pen to mark 3/8-inch marks across the edge. Push an embroidery awl through the first mark to make a tiny hole. Pull up the thread a make the first slip stitch on the hook. Chain 4. Use the awl to make several more holes at the marks. (Stay ahead of your crochet about 8-10 holes). *(Sc, ch 3) in the hole at the next mark. Repeat from * across. (See the first part of the tutorial at the above link if you need pictures for this foundation row.)

Row 1: Ch 3; turn. 2 dc in first ch-3 space. Ch 1, (3 dc, ch 1) in each ch-3 space across. Ch 1; turn.


Row 2: Skip next dc. Sc in middle dc. [Skip next dc, 3 dc in ch-1 space, skip dc, sc in middle dc] across to last stitch. Sc in last stitch. Fasten off. Weave in ends.


"Jonquils" is the third edging in this Garden Series. Watch for it in the next couple of days.

"Garden Series" Crochet Edgings: #3-Jonquils

$
0
0

I love this third edging. "Jonquils" is a little more difficult, but not much. The picot stitches on top of the double crochets remind me of the ruffled heads of jonquils on long thin stems, hence the name.

Note: The front and back of crochet stitches look different, as you would expect. I want the smooth front side of the double crochet in this edging to show on the front of the towel, so I am careful to begin the foundation row with the back side of the towel facing me. If mark the towel and start on the back, I'll be ready to turn the towel and do Row 1 on the front. Row 2 shows the back of the picot stitches, but I think it is prettier to show the front of the double crochet. It may not matter at all to you which side of which row shows...

Again, you'll begin the Foundation Row as in the Garden Fence edging. Use a washable marking pen to mark 3/8-inch marks across the edge. Push an embroidery awl through the first mark to make a tiny hole. Pull up the thread and make the first slip knot. Chain 4. (Use the awl to make several more holes at the marks. Stay ahead of your crochet about 8-10 holes.) *Sc, ch 3 in the next mark. Repeat from * across. (See the pictures in the tutorial at the link above if you need help with pictures of this foundation row.)

Row 1: Ch 1; turn. Sc in the first ch-3 space. Ch 3, 4 dc in next ch-3 space. Ch 3, sc in the next ch-3 space. [Ch 3, 4 dc in next ch-3 space. Ch 3, sc in next ch-3 space] across, ending with the sc in the end space.


Row 2: Ch 3 and turn. Skip the ch-3 space. Sc in the first dc of group of 4 dc. Ch 3, sc in next dc. Ch 3, sc in next dc. Ch 3, sc in last dc of group. Ch 3, skip ch-3 space, sc in next sc.  Repeat [Ch 3, skip ch-3 space, sc in first dc. (Ch 3, sc in next dc) three times. Ch 3, skip ch-3 space, sc in sc] across. Fasten off. Weave in ends.


Hopefully, the following pictures expand the directions for Row 2.


Great Grandma's Embroidered Lace

$
0
0

This is a picture of my Great Grandma. Her name was Marian Bell Anderson. She was born on January 17, 1864. The eyelet lace pictured at the bottom of the post was made by Great Grandma as part of her trousseau. In 1885 she was 21 years old, living on the frontier of Idaho and preparing to get married to Olaf Anderson in November. Marian and Olaf lived in the area of Rexburg, Idaho for the rest of their lives. I am just amazed at the skill that went into this embroidery and the amount of time it must have taken Grandma. I'm certainly glad some of her talent passed into my own hands.

My grandmother, Irene Anderson Clements was a devoted genealogist and wrote a history of  her own life and the lives of her parents and other ancestors. It is a blessing to me to know so much about my father's family. Grandma wrote this about her mother, Marian and the lace:

"Mother liked all kinds of hand work. It is hard to say what she liked best. She enjoyed making quilts. She made many, from heavy camp quilts, to fancy embroidered and silk quilts. The Relief Society does a lot of quilting and she was anxious to help. She soon became known as one of the most skillful quilters, and was made head of this department on work day at Relief Society. Then as she was particular and liked to have things just right, she became an almost perfect marker especially for the most complicated patterns. Her fame spread all over town and some expensive quilts were brought to her to be marked by well-to-do people, some she scarcely knew. They were glad to have her mark the quilts, even though it was impossible for her to help with the quilting. It would be hard to estimate the number of quilts that she helped quilt and also quilted alone.

She enjoyed knitting very much. She knit hose for her father, brothers and sisters, husband, children and grandchildren. She knit many pairs of gloves and mittens, also a number of sweaters. She especially was good at making knitted lace. Every one who has some of her knitted lace prizes it very highly. In her early married life she knitted a full sized bed spread with no. 8 thread. She did crochet work. She was an expert at dressmaking, etc. Besides the sewing for family and friends that she mentions in her history, she did most of the sewing for her children and helped as long as she could with sewing for her grandchildren.

She enjoyed making fancy pillows, pin cushions, and any other knick knack that she saw. She made a variety of rugs. In fact, she was always interested in new patterns and ideas. She watched for ways to use material she had on hand to make her family more comfortable and her home more attractive.

At the time of her marriage, it was popular to do eyelet embroidery in lingerie, household linens, baby clothes, etc. Her skill with the needle is shown by the petticoat she made to wear when she was married. This petticoat was 37 inches long, 90 inches wide and gathered onto a band at the waist that was 26 inches long. It fastened with a button and button hole. She embroidered a scalloped flounce which was 9 inches wide at the scallop. Then she made five groups of tucks, two in each group, arranged above the flounce. This scallop is one of 18 cut from that petticoat. Mother wore this petticoat until it was worn out."

Because I know what it takes to embroider even the simplest eyelet, I am in awe that Grandma embroidered eighteen of these scallops on a garment that would never even be seen! She is my handwork hero!


Other Favorite: Lacy Slant Stitch Crocheted Dishcloth

$
0
0

I have used this stitch for dishcloths many times and really like it. The fabric is firm without being dense, and that allows the cloth to dry a little faster. The stitch forms a kind of scallop on three sides but the foundation chain side remains flat. Because of this, I think the cloth requires some kind of edging. After trying several things, I think this lacy edge is prettiest.

Lacy Slant Stitch Crocheted Dishcloth:

Row 1: Ch 36. (dc, ch 2, sc) in 4th chain from hook. *Skip next 3 chs, (2 dc, ch 2 sc) in next ch. Repeat from * across.
Rows 2-17: Ch 2, turn (dc, ch 2, sc) in next ch-2 space. (2 dc, ch 2, sc) in each ch-2 space across.
Edging: Ch 3, turn. (hdc, ch 3, hdc) in first ch-2 space; first corner made. (Hdc, ch 3, hdc) in each ch-2 space across top to the last ch-2 space. (Hdc, ch 3, hdc, ch 3) in last ch-2 space; second corner made. (Hdc, ch 3, hdc) around ch-2 post at the end of the last pattern row. (Hdc, ch 3, hdc) around each ch-2 post across side to the last ch-2 post. (Hdc, ch 3, hdc, ch 3, hdc) in last ch-3 post; third corner made. Ch 3. (Hdc, ch 3, hdc) in chain spaces across foundation row, including the last space. (Ch 3, hdc, ch 3, hdc) in corner stitch – the original first chain in the foundation chain; fourth corner made. (Hdc, ch 3, hdc) around ch-2 post at end of pattern row, and around each ch-2 post across last side. Ch 3, sl st in base of ch-3.
Alternate edging: Dc evenly around edges with (dc, ch 2, dc) in each corner

New Project - A Quick Hope Chest

$
0
0

One of the blessings of writing this blog has been to connect with people who e-mail me. I have received a number of e-mails that say something like this: "I am getting married in such and such month (about six months away), and really want to have something like a hope chest..." or "My daughter is getting married in three months and I would really like to make a quick hope chest for her, but am also busy with wedding plans..." or "I would love to make a hope chest for my daughters, but I'm not very skilled at sewing or embroidery..." The common expression is a wish for creating a quick and/or simple hope chest and they each ask for my suggestions on how to accomplish this. I've thought about this idea of quick and simple as it applies to a hope chest.

Obviously, one common aspect of a hope chest is for a young girl to develop the skills she will need to create a home, and, in the process, create items for her future use. This isn't usually accomplished either quickly or easily. But, another important aspect of making a hope chest is simply collecting and acquiring the useful items and accepting and profiting from the gifts and wisdom of older and more experienced mentors. I am all for encouraging anyone who wants to have a hope chest, regardless of the time available or who might make it!

If you are a regular reader of this blog, you cannot miss the significance of what I am creating for Miss Abigail. She has made a number of lovely things for her hope chest, and I'm sure will create more as she reaches an age when her own "nesting" instincts kick in. I continue to encourage and help her. But, I'm sure it doesn't escape any of you that, because of some really magnificent gifts, even some fairly ordinary gifts, and my own steady contribution, Miss Abigail is one lucky girl! But this is what any mother might wish for her daughter, even if the time is short. You probably agree or you wouldn't be reading this blog. So, I've set myself a challenge - to produce a "weekend hope chest." To see if one could produce a nice collection of basic, necessary handmade items in a really short time. My husband thinks I'm a little crazy and my friends are doubtful. In fact, one friend thinks the idea of a weekend hope chest might defeat the purpose of a hope chest altogether. But this is my response to all those who continue to want to create a hope chest in a hurry.

So I made a list of what I think is basic. I have ransacked my resources for projects that are both beautiful and quick, and I've shopped for and collected all the stuff, including details like buttons, thread and a new blade for the rotary cutter. (BTW, I've kept track of all my expenses and I won't be revealing the totality of this info to my husband, but you might be interested.) I've organized the steps and made a work plan. I've cleaned the sewing room. Now I'm just looking for two days in a row to meet the challenge. Because I try to keep the Sabbath, and this project will certainly qualify as work, my calendar cannot include Sunday. So, stay tuned...

I would love to hear your comments about what would have to be included in such a hope chest. What do you think?

Update on the Quick Hope Chest

$
0
0
I should be busy at home on the second day of the quick hope chest, but honestly could not find two days in a row for some time yet. I am frustrated by what this says about my life right now! I think May is the busiest month of the year, even considering Christmas. I finally decided that I just needed to get started yesterday and will finish up on Friday - God willing! I have to take my weekends on odd days, I guess. I did think you might be interested to know that I started, at least.

I began working at 7:00 a.m. and finished Day One when my husband drove up at 6:00 p.m. It was a long day, hunched over the cutting table, measuring, marking, and cutting. But I took a lunch break and stopped for a few minutes in the afternoon. Everything on my list is now cut out and marked and I got a head start on the fun. A few items are finished, including the set of bath towels, one set of appliqued dishtowels, the recipe binder and the fridge magnets (these are very cute!) A few items are more than half-finished. I also crocheted a dishcloth during our regular Tuesday night TV show. The rest of the items on the list are neatly stacked next to the sewing machine, awaiting Day Two.

I did have one COLOSSAL fail! The bleached apron project took an unexpected turn! My husband expects me to report this failure, in the interest of full disclosure, but it will require a separate post, as well as a picture, to explain...

Pictures of the Quick Hope Chest

$
0
0

I finished most of what was on my list on the second day, but made some dumb time mistakes. So, the weekend hope chest turned out to be a three-day hope chest, rather than two. Just think in terms of a three-day weekend. I am very pleased with the results - except for that horrible bleached apron, which I will report on, but I think I'll show you my successes first! Here are the projects I completed:

1 dozen dishtowels--
Raw-edge Applique
Dyed and tucked, with button embellishment
Dyed and stenciled
Simple hemmed homespun, baby rick-rack, button magnets

10 hand towels along with a crocheted towel tender--
Printed, simple lace trim, yo-yos and crocheted chain daisies

2 V-stitch crocheted dishcloths--

5 refrigerator magnets--
Antique white button daisies and that cute baby is my grandson!

1 decorated binder--
for collected menus and associated recipes

1 set of quilted place mats and napkins--


 1 set of embellished bed sheets--
Simple "beading" eyelet lace threaded with grosgrain ribbon

 2 pair of pillowcases--
One is a simple cotton print and the other has a simple ribbon trim

1 set of embellished bath towels--

1 couch quilt--
Flannel "rag" style quilt - it still needs to be washed and fluffed!

1 birthday set--
A birthday table runner and  birthday banner

I am really glad to have some of these things finished. I work from a personal list of things that I want to do before I feel like Abigail's hope chest is finished and she now has at least one set of bed sheets and some bath towels. Each person will have different needs for her hope chest. My idea of a quick hope chest just reflects projects that could be done quickly, especially if one is thinking of creating a gift. It takes some thought to come up with a list of items that would suit each individual.

I think a very basic hope chest would include at least one kitchen set (with an apron, 7 dishtowels, 4-7 hand towels, 7 dishcloths, and a set of hot pads) a recipe box or binder with favorite recipes from home, a tablecloth or set of place mats, two sets of bed sheets and two sets of bath towels.The number of linens reflects a need to have enough to last until you could get the laundry done. Other important items, in my mind, include at least a lap quilt, a first-aid kit with a basic first aid book, basic kitchen drawer items like a small hammer, screw drivers, etc. Holiday things like Christmas ornaments and a basic family history and scrapbook are also important to me. Obviously, some things may need to be saved for and purchased, such as basic dishes, silverware and pots and pans.

I know people wonder why I am doing this. People ask me if I don't trust that Abigail will receive any wedding gifts and I laugh and say that I am hopeful that she will. But, who knows when she might get married and what those gifts might be and sometimes they can be pretty random. This is my gift - and along the way I hope I am teaching her to look ahead, to value creating a home, to develop skills, to be creative and to "prepare every needful thing."  Taking responsibility to prepare for a future need is simple wisdom. None of us knows what the future holds and if Abigail's need is not as great as the preparation, she will have an excess to share.

Goodies from Grandma

$
0
0

Well, you will never guess where I have been for the past several weeks! I have been preparing to be the head cook and dish washer for a girls camp. Ten meals for 60 people with two of them serving 140! I have been so terrified since I have never done anything like this before. But, everything came off very well and I am home and so relieved and grateful to pick up my regular life again. So back to the hope chest, I hope!

When I was visiting my mother-in-law a couple of months ago, she presented me with a bag of goodies! She told me that she had completed all the wedding quilts for her grandchildren and that she was absolutely finished with embroidery. She remarked that she doesn't see well any longer and would I be interested in the blocks that were extra. Of course I am interested! I am really quite excited as there are six or eight of each design of the large cross-stitched blocks and eight of the little baby quilt blocks. She called the other day to report that she had found more finished blocks in the basement while cleaning house. Lucky for me and I'm hoping for more discoveries! I'll put these together with large printed fabric blocks. I can't wait to see how they will turn out.

Finally Finished Pillowcases!

$
0
0


I finally finished the embroidery on these pillowcases. Hooray!

Fabric for Kitchen Linens

$
0
0

I recently had an e-mail question about what kinds of fabric make good kitchen linens. This reader was interested in saving some money by sewing and decorating her own kitchen towels. I think this is a great question and thought perhaps more than she is interested in the subject.

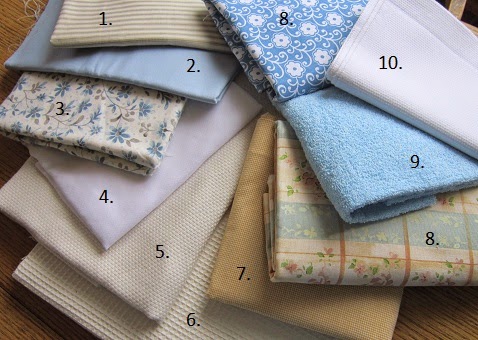
The picture shows my favorite fabrics for making towels and other kitchen linens.

1. This is a soft "ticking" fabric. It is 100% cotton and usually 45 inches wide, sometimes 60 inches. It is called ticking because the twill weave and stripe pattern is typical of what is called pillow ticking - the fabric that used to cover pillows. There is a stiffer ticking - more like canvas, but you want to find the softer, towel-like fabric. I like to make kitchen hand towels from ticking and it works also for aprons. You can find ticking in the utility fabrics section of the store.

2. This is a plain weave fabric from the section of the fabric store called the "bottom weights." This is the fabric that is meant for making pants and skirts and other "bottom" garments. There are a number of choices for hand towels and aprons in the bottom weight section, but you want to be sure to look for 100% cotton fabric (or linen - but that would defeat the money savings wouldn't it!) The fabric could be either a plain weave or a twill weave - either one would work. Bottom weight fabric would also make nice place mats, napkins, or a small tablecloth.

3. Flannel makes a great kitchen hand towel. I like to sew two panels together to make it thick enough and then quilt or otherwise stitch it to hold it together. I like the many patterns and prints now available! Diaper flannel (if you can find it) and quilters flannel are sometimes a little thicker than regular flannel. The more you wash flannel, the better it gets. Flannel also works for dishcloths.

4. This is a piece of diaper fabric. You can buy diaper flannel, but diaper fabric is woven in a "birds eye" weave. It is 100% cotton and is 36 inches wide. Diapers, even the ones you buy already made (get the open, flat kind, NOT the pre folded ones) are truly wonderful dishtowels! I had a set in my own hope chest, painted with liquid embroidery by my cousin.

5. Monks Cloth is a thick, 100% cotton plain weave fabric that is usually 60 inches wide. The weave is very large and looks like huge cross stitch fabric. You can cross stitch on it and the pattern develops quickly! I also like to do Swedish Weaving on this fabric. It makes a very nice kitchen hand towel and maybe dishcloths as well. It would make a nice table cloth or place mats with cross-stitching.

6. This is a 100% cotton "waffle weave" fabric, sometimes called waffle weave muslin. It is also 60 inches wide. I love this fabric for making dishtowels and dishcloths, but you have to preshrink it even before measuring it as it shrinks so much. Just plan for that. It is a wonderfully thirsty fabric and lends itself to several kinds of decorating. You can see one example of hand made dishtowels here and another one here. The first link doesn't mention preshrinking. I certainly would do that first! Waffle weave fabric is found in the utility fabric section of the store, along with the muslin and ticking.

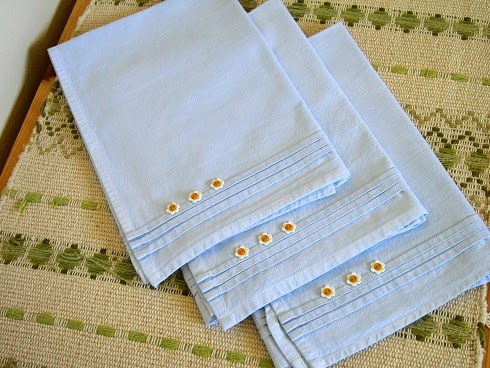
7. This is 100% cotton fabric called "homespun." This fabric makes really great dishtowels! I have several in my own kitchen drawer. Just be sure to get 100% cotton. You can find homespun with the quilting cottons in the fabric store. I have made this and this set for the hope chest so far.

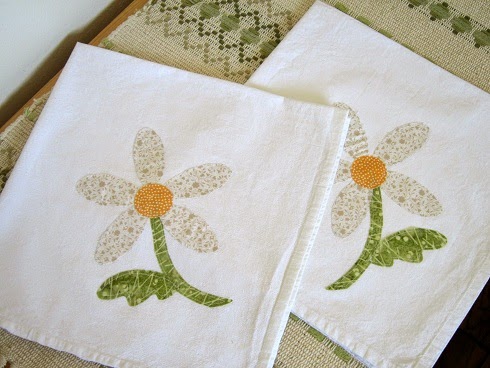
8. These are two plain weave 100% cotton prints that I found in the "home dec" section of the fabric store. This fabric is often labeled dry clean only, but I use it for hand towels and aprons and place mats, napkins and tablecloths. I don't dry clean them. I usually just wash them on warm and dry on the clothesline. I understand that the fabric is labeled thus because the manufacturing is so variable that it might shrink (a lot or unevenly!) or it might "crock" (which means that heavily dyed fabric transfers excess dye to other fabric), or fade or exhibit any number of other problems. So I just take a chance because there are some wonderful choices in this section. I have never had any problems, but that doesn't mean you won't... When I make things for the hope chest, I try to always pre-wash and pre-shrink - so that fifteen years from now Abigail doesn't get a nasty surprise when she does laundry.

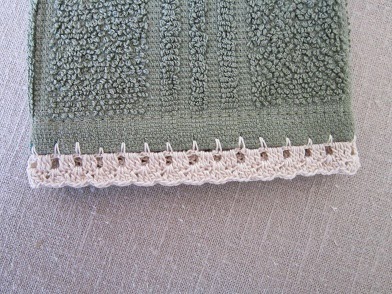
9. This is 100% cotton terry cloth. The width varies, usually 45 or 60 inches wide. It could used for hand towels and dishcloths. A pretty cotton print bias edging looks very pretty.

10. This fabric is called "huck" toweling or huckaback. It is narrow, usually only 15 inches wide and the edges are finished with a selvage. Huck toweling has a distinctive vertical raised thread in the weave and is most often used for Swedish Weaving decoration and other embroidery. It is soft and absorbent and makes a nice kitchen towel or tray cloth.

There is one more fabric that I use for dishtowels, but I didn't have any to put in the picture. Osnaburg fabric is found with the rest of the muslins in the fabric store and is a little bit thicker than regular muslin. It is more like homespun and it makes great dishtowels. It is 100% cotton, usually 45 or 60 inches wide and comes mainly in a natural darkish tan color. Osnaburg is a plain weave, so it frays nicely and it takes embroidery really well. It needs to be washed a couple of times before it is nicely absorbent.

Speaking of muslin, I have read that some people make dishtowels from muslin. I keep meaning to try - it is very inexpensive and would lend itself to many decorative techniques. When I look at it, though, it seems to be woven so tightly that I can't imagine that it would be very absorbent. Maybe someone has experience with it...

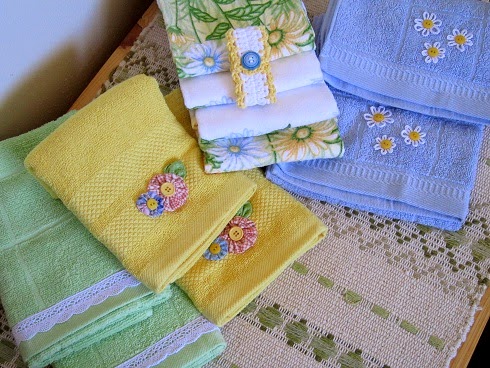
Just a quick comment about price. Sometimes new fabric can be more expensive than just looking for a good deal on ready-made linens. I always watch for the sales or use a 40% coupon to get the best deal, and usually have a stack of "hope chest" fabric in a stash, waiting for the next creative project!

A Peek Inside - Painted Wall Hook

$
0
0

A couple of months ago I attended the State 4-H Home Ec School. This event is one of the highlights of my 4-H year and this year was no exception. I was in the track to learn about Interior Design. An instructor taught us a little bit about recycling old things into new things for the home and introduced this wall hook project. I was given an old oak drawer front. I painted it orange, attached the hooks to it and there it was - an old board turned into something nice and useful. Now I don't have to pay a small fortune to buy the same thing at Hobby Lobby. Sometimes recycling can be really great! And, I love having something so nice to put into my hope chest.

Respectfully submitted by Miss Abigail.

Tutorial - Scalloped Ticking Stripe Hand Towel

$
0
0

This is an example of a hand towel made from 100% cotton "ticking stripe" fabric. I have almost finished what I am calling the "peachy/green" kitchen set and a set of two of these hand towels are part of that set. One yard of ticking fabric, along with 1/4 yard of a matching cotton print for the facing, made two towels.


The first step was to pre-shrink both fabrics and cut the towels to size. My towels were cut 20 inches in width by 28 inches in length. I used a large manilla envelope like a t-square and drew a line across the bottom of both ends of the towel to square them up.

Then I used a scrapbooking design tool draw a scalloped edge along the line at both ends of the towel. To make the scallops even I began with the center of a scallop in the middle of the towel. If you want to do the math to adjust the size of the scallops and make them come out even on the edges you may do so, I just made the scallops on the edges a little bigger to take up any extra space.


Next, I turned and pressed the side edges to make a 1/2-inch hem along the sides of the towel.


I cut four facing strips from the printed fabric that were 2 3/4-inches deep and the width of the towel. I turned and pressed a 1/2-inch hem across the long edge of each strip. I placed the facing, with right sides together, matching the bottom edge of the towel and pinned.

I used the innermost pressed line of the towel side hem as a guide and sewed down the side of the hem facing and then followed the penciled lines to sew around the scallops across the bottom of the towel. I finished with the far side edge.


I trimmed the seam and clipped the curves and points.


I turned the faced hem and carefully pressed the scallops, tucking under the side hems and pinning across the top edge of the hem.


Then I sewed the hem closed, keeping as close to the edge as possible.

 
I pressed again and repeated the process on the other end. The towel is finished.


Peachy/Green Kitchen Set

$
0
0

I made these dishcloths some time ago using yarn from my stash and my favorite granny square pattern. I liked the mix of colors so much that I decided to do a kitchen set for Miss Abigail's hope chest using these colors. The stack has grown over the last month. Here are the pictures.


The pattern for the ruffled dishmop, using crochet thread is found here. I used a thin cotton yarn for this set and only put 4 rows on, plus the last single crochet border. The regular worsted weight cotton yarn is just too thick for this pattern. However, a sport weight cotton yarn, like Paton's "Grace" yarn or another "light"  worsted weight (#2 or #3) seems okay with fewer rows worked.

I have patterns written for the edging and the other two dishcloths. Watch for separate posts for these. Soon, I hope.


Link - A Young Girl's Hope Chest

$
0
0


I found a lovely blog post about a young girl's hope chest this morning. Kristy Smith Howard shared her story at a lovely blog called Kindred Grace. If you are interested in hope chests, you'll be ever so glad you read it.

Pattern - Diagonal Dishcloth

$
0
0

Here is the pattern for the striped diagonal dishcloths that were shared in the post about the "Peachy/Green" kitchen set. The dishcloth in this picture was crocheted without changing colors. If you wanted stripes, you would just change colors at the end of a row. I am loving this pattern!  It is very quick and easy. I can make a set in no time at all.

Diagonal Dishcloth
medium weight cotton yarn
size “H” crochet hook

Row 1: Ch 4, (dc, ch 2, 2 dc) in fourth chain from the hook. (First 3 skipped chains count as the first dc). Row 2: Ch 3, turn. (ch-3 counts as the first dc in this and subsequent rows.) Dc in next dc, (2 dc, ch 2, 2 dc) in next ch-2 space, dc in next two dc. Row 3: Ch 3, turn. Dc in next dc and in each dc across to next ch-2 space. (2 dc, ch 2, 2 dc) in corner space. Dc in each dc across. Row 4-12: (or until desired size is reached) Repeat row 3. Finish off and weave in ends.

Edging: Cast on in top corner. 3 sc in corner space. (Sc, ch 2 dc) around post at the end of each row across the side. (Sc, ch 2, dc) around post at corner. (Skip next dc, sc, ch 2, dc in next dc) evenly around next 2 sides. (Sc, ch 2, dc) around posts across last side. Slip stitch in sc at beginning of round.

Pattern - Alternate Double V-Stitch Dishcloth

$
0
0

Here is the pattern for the Double V-Stitch Dishcloth pictured in the "Peachy/Green" kitchen set. The directions for the edging only seem complicated. I wrote directions for each side because the top and bottom are different from the sides. The key to an edging is to simply crochet evenly around all sides. If my directions seem complicated just put the stitches in evenly and call it good.

Alternate Double V-Stitch Dishcloth
 medium weight cotton yarn 
size “G” crochet hook 

Foundation: Ch 39 

Row 1: 2 dc into the 5th ch from hook. **Ch 1, 2 dc into next ch, miss 3 ch, (1 dc, ch 2, 1 dc) into next ch. Miss 3 ch. 2 dc into next ch.** Repeat instructions between ** across, ending last repeat when 2 ch remain. Miss 1 ch, 1 dc into last ch. Ch 3, turn.
Row 2: (Turning chain counts as first dc.) Miss first stitch.** Work (2 dc, ch 1, 2 dc) into next 2-ch space. Work (1 dc, ch 2, 1 dc) into next ch-1 space.** Repeat between ** across, ending with a dc in top of turning ch.
Rows 3-14: (or until fabric is approximately square) Repeat row 2. Finish off and weave in ends. 

Edging Round 1: Cast on in corner just finished with a contrasting color of yarn. Ch 2. Sc in space at bottom of ch-2. Ch 2. Sc in end of the last row worked. (Ch 2, sc) in end of each row across side, ending with a sc in the top of the beginning row. (Ch 2, sc) around dc post in beginning row twice. Corner turned. Ch 2. Miss the first stitch at bottom of double V-stitch. Sc in the next stitch at the bottom of the double V-stitch.*(Ch 2, sc ) in next two ch-3 spaces. Miss the next stitch. (Ch 2, sc) in next stitch at the bottom of the double V-stitch. Repeat from * three more times across the bottom, ending with a sc in the last stitch. (Ch 2, sc) around post in beginning row. (Ch 2, sc) in end of first row. (Ch 2, sc) in ends of each row across side. (Ch 2, sc) twice around post at beginning of the last row. Corner turned. **(Ch 2, sc) in top of double V-stitch. . (Ch 2, sc) in space at top of single V-stitch.** Repeat between ** across top. (Ch 2, sc in ch-2 space at beginning of round.

Edging Round 2: Ch 2, dc in same stitch. (sc, ch 2, dc) in each ch 2 space around. End with a sl st in the sc at beginning of round. Finish off.

A Peek Inside - Handwoven Tea Towels

$
0
0

Miss Abigail and I went to the Heart of New Mexico Fiber Gathering over the weekend and found these beautiful handwoven tea towels. We couldn't pass them up. Abigail is loving orange right now and my favorite color is green. I think they make a very pretty set for the hope chest!

October - Family History Month

$
0
0

October is national "Family History Month" and I am chin-deep in organizing and working on our family history. I have created two scrapbooks for Miss Abigail of her baby and toddler years and am working on other projects related to genealogy. One project will eventually be a scrapbook called "The Women You Come From" with stories to go along with these pictures. I love these women. Each of them are strong, beautiful and inspirational. I want to tell their stories to my children and grandchildren.

Heirloom Crocheted Bookmark

$
0
0

In honor of Family History Month I wanted to show you this crocheted filet style bookmark. My grandmother, Minnie Irene Anderson Clements, made this for me when I was young. She made these bookmarks in different colors, for all of her grandchildren and many of her great grandchildren. It measures about 7.5 inches long and is about 2 inches wide. The thread size is probably 30 and the hook size was probably a 12 or 14. Very tiny and hard to work. This is a treasure to me.

Minnie Irene Anderson Clements 1886-1978

Viewing all 212 articles
Browse latest View live